Enhance the Beauty of Wood❈ General Finishes: Water Based Wood Stains Created to be easy to use and consistently outperform your expectations even on difficult woods like maple and pine. Only the finest ingredients are used to create the rich color, heavy body and longer open time that's the hallmark of these nonflammable dye/pigment blend water based stains. The rich colors enhance the beauty of the wood while the heavy bodied formula and longer open time makes it easier to control the depth and evenness of color. Created to be easy to use and consistently outperform your expectations even on difficult woods like maple and pine. Only the finest ingredients are used to create the rich color, heavy body and longer open time that's the hallmark of these nonflammable dye/pigment blend water based stains. The rich colors enhance the beauty of the wood while the heavy bodied formula and longer open time makes it easier to control the depth and evenness of color. |
📌 Click on this image ↓ ↓ for More Detailed Information from 'General Finishes'.  |
DIY Application Guidefor General Finishes Water Based FinishesThese are general instructions to guide you through the finishing process using water based products. Always refer to the manufacturer's specific instructions. Application guidelines for each manufacturer may vary. ▸ Attributes of General Finishes Water Based FinishesThis information has been developed to assist you in selecting the best finish for your project. Application techniques differ between oil based and water based products. There are several factors that may influence your choice.▸ Strong, Clear Vibrant ColorsNothing produces beautiful colors better than water based finishing products. Red, blues and greens and everything between produce vibrantly in water based finishes. Whether you want brilliant hues to enhance a neutral room, a touch of whimsy or the comfort of classic colors; furniture color is the perfect venue for self expression. With unfinished furniture, the possibilities are endless.▸ Top Coat ColorWater based top coats are milky white in the can, dry to a crystal clear finish, and will remain clear throughout the life your project. Oil based top coats have a slight amber color in the can, and dry to a clear finish which can darken over time.▸ Clean UpWater based finishes clean up conveniently with water.▸ Non-CombustibleWater based products are non-combustible, unlike oil based products.▸ Recommended Finish For Open Grained WoodsWater based products are a topical finish. We recommend using them on any woods that penetrate easily, such as pine or aspen, to produce a more even looking finish. Conversely, oil based stains tend to penetrate the wood more, and can bring out more variation in the final result. With that said, remember you are applying finish to parts of a tree, and every piece will look different! Use the fingernail test. If your fingernail dents the surface, you have a soft wood, like pine or aspen.▸ Sun LightThe sun affects everything. If left in strong sunlight, the pigments and dyes in Wood Stains will fade like everything else. However, water based Milk Paints paints are an ideal exterior product and hold color quite well over time.▸ Grain RaiseWater based products produce more grain raising than oil based finishes - they do require a different finishing technique. Before applying the finish, spray the project with water or rub down with a damp cloth. Allow the wood to dry and then sand lightly to remove the raised grain. This conditions the wood to accept water based finishes. You will get a perfect finish by following the application instructions. The amount of grain raising is dependent on the type of wood species.▸ Dry Time, Temperature & HumidityWater based products dry faster so your project can be completed faster. Dry times are temperature and humidity dependent. Dry time is normally 2-4 hours under ideal conditions (70° and 70% humidity). Cooler temperatures or higher humidity will prolong dry time to 8-10 hours. Water based finishes must be applied at temperatures above 65 F. Cooler temperatures will adversely affect how the finish will level and harden, causing fish-eyes or craters. If it is cold enough to wear a sweater it is too cold to apply a water based finish. Good ventilation, air movement and higher temperatures will accelerate dry time. If working in high temperatures or low humidity, water based finishes may be thinned with 10-20% water or General Finishes Extender (3 to 6 oz. per quart) to improve open time for application. High humidity can extend the dry time but will not harm the final finish.▸ Mixing Custom Colors & TintingYou can create unique colors by mixing any two shades of water based products. Be sure to write down exactly how much of each color is in the mix and mix enough to complete the entire project. Tinting may be accomplished by adding 2 oz of Wood Stain and 2 oz. of water to a pint of Top Coat (or 4 oz. of each to a quart). Mix the water and stain together first, then add this mixture to tint the Top Coat. Stir well. Do not mix water based products with oil based products.▸ Cure TimeAllow the final Top Coat to cure for a period of 14 days to reach optimum hardness. You may use your furniture sooner. Just treat it with special care during the curing period.▸ MaintenanceTo maintain the finish clean surface with a damp washcloth and wipe dry. Cleaners such as Pledge and Murphy's Oil Soap are not recommended because they leave a dull residue on the finish. Water based surfaces may be cleaned with a damp cloth or General Finishes Orange Oil. Do not use household cleaners or window cleaners. Paste wax is not recommended because it builds up and yellows, thus becoming a maintenance problem. Top Coats may be recoated at any time in the future. Remove any grease or dirt, lightly sand with #320 or finer grit sandpaper, and then apply another coat.▸ Coverage150 sq. ft. per quart.▸ StorageKeep from freezing.▸ SprayingWhile both oil based and water based products can be sprayed, water based products really spray like a dream with water clean up. Water based topcoats are self leveling and dry quickly.▸ Surface Preparation
▸ Supplies Needed
▸ Application of General Finishes Water Based Wood Stains Tips
▸ Hand Application of General Finishes Water Based Wood Stains
|

You'll learn step-by-step as you work your way through 51 proven and easy-to-follow finishing exercises. ▸ Buy the Book

The long-awaited and completely updated third revised edition of Understanding Wood Finishing is the most practical, comprehensive book on finishing ever published, and is widely regarded as the bible of wood finishing. ▸ Buy the Book

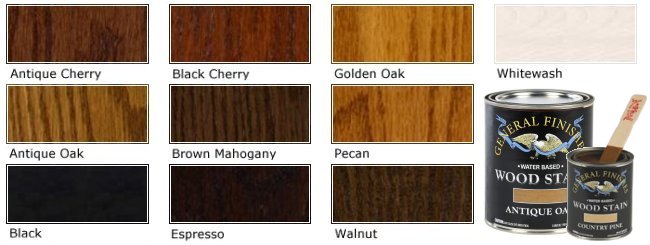
▸ 12 standard wood colors
▸ Duplicated on birch veneer
▸ See how colors interact
▸ 5 color intensity scale
▸ Helps match your desired shade
▸ 80 different color variations
▸ Time saver for matching colors
🔎 View Larger Image
