Making Box Joints ~ Page 3 |
| Step 1. Before you cut the actual box joints, keep in mind that the width of your box sides must be an increment of the finger width. Otherwise, you'll wind up with less-than-pleasing partial fingers at the bottom of your box. So, in the example of 1/4"-thick stock discussed here and in the jig-building article, the width of the workpieces must be an increment of 1/4" (such as 5", 51/4", 51/2", etc.). |
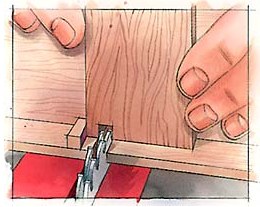
 Step 2. Mark the front, back, and side pieces of your box. Also, mark the top edge on each of these pieces. For each box you make, you cut the sides consecutively, and the front and back consecutively. It doesn't matter which pair you do first, so we'll start with the sides. For all of the following cuts, hold the top edge of the workpiece toward the jig pin for the first cut. Now, put hand pressure on the jig to hold its miter-gauge bar firmly against the right side of the tablesaw channel. Make the first cut as shown above. Place the just-cut notch over the jib pin and repeat to cut fingers along the full width of the workpiece. Cut the other side piece in the same fashion. Step 2. Mark the front, back, and side pieces of your box. Also, mark the top edge on each of these pieces. For each box you make, you cut the sides consecutively, and the front and back consecutively. It doesn't matter which pair you do first, so we'll start with the sides. For all of the following cuts, hold the top edge of the workpiece toward the jig pin for the first cut. Now, put hand pressure on the jig to hold its miter-gauge bar firmly against the right side of the tablesaw channel. Make the first cut as shown above. Place the just-cut notch over the jib pin and repeat to cut fingers along the full width of the workpiece. Cut the other side piece in the same fashion. |
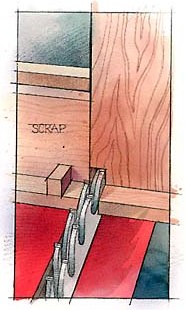
 Step 3. Before you cut the front and back, cut one notch into a scrap piece, just as you cut the first notch into the side piece earlier. Step 3. Before you cut the front and back, cut one notch into a scrap piece, just as you cut the first notch into the side piece earlier.
Position this notch over the pin as shown at left, and butt the top edge of the front piece against the scrap before making a cut. Make the remaining cuts in the front piece by removing the scrap, placing the notch over the pin, and proceeding as described earlier. Cut the back piece just as you cut the front. |
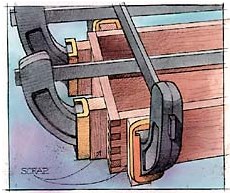
 Step 4. To join your box pieces, apply glue to all of the mating surfaces with a small brush. Tap the joints together with a rubber mallet if necessary. Clamp the box together as shown above. (You may need to position a clamp diagonally to square the box.) Note that we used scrap pieces on each side of the corners to evenly distribute the clamping pressure along the joint. Wider boxes may require additional clamps. After the glue dries, sand the fingers flush with the sides, front, and back. Be careful not to round over the corners. Step 4. To join your box pieces, apply glue to all of the mating surfaces with a small brush. Tap the joints together with a rubber mallet if necessary. Clamp the box together as shown above. (You may need to position a clamp diagonally to square the box.) Note that we used scrap pieces on each side of the corners to evenly distribute the clamping pressure along the joint. Wider boxes may require additional clamps. After the glue dries, sand the fingers flush with the sides, front, and back. Be careful not to round over the corners.
Article Content © WOODstore.net Visit us again at www.azWoodman.com |
🌵 Search azWoodman

