 Basically, there are two kinds of people: those who like knickknacks and those who don't. If you belong to the second group, go read an article on chainsaws or something. But if you enjoy collecting objects, the shelves described here are perfect for displaying all those photos, mementos and cherished curios. Basically, there are two kinds of people: those who like knickknacks and those who don't. If you belong to the second group, go read an article on chainsaws or something. But if you enjoy collecting objects, the shelves described here are perfect for displaying all those photos, mementos and cherished curios.
These shelves would cost an arm and a leg if you bought them from some glossy mail-order catalog. But behind the steep prices and glamorous photography is a secret: these shelves are really easy to make if you have an accurate miter box and a sharp saw. Beyond these simple tools, all you need is a few pieces of lumberyard molding and a little imagination. This project alone is a great reason to buy a topnotch mitering tool one you can rely on for years. (Based on catalog prices for these shelves, your saw's apt to pay for itself in short order.) Although a well-adjusted table saw will do, it's best to go with an accurate miter box, and best of all, a motorized one. A hand mitering set includes a miter box and a backsaw; a compound miter saw (also known as a chopsaw) and a sliding compound miter saw are the higher-end types. (You may want to have a look at our buyer's guide to miter saws.) With any of these tools, use a high-quality finish-cutting blade for really smooth cuts. Now, let's get to work. |
☑ Step by Step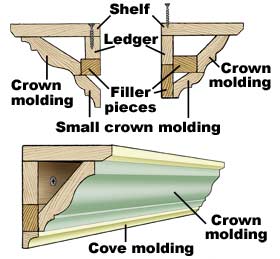 1. Design your shelf. The molding aisle at your local lumberyard is an exotic place. There you'll find stacks and racks of contoured stock, organized under names that may make no sense at all: chair rail, base, quarter-round, shoe, casing, stool and so on. Not to worry. Look for crown or cornice molding, the stuff that's meant to be installed where the walls meet the ceiling. Collect samples of your favorites plus any others that might look good, like cove moldings. Don't buy long lengths at this stage. In fact, you can go home with a foot-long sample of each molding type. That's enough to design your project. 1. Design your shelf. The molding aisle at your local lumberyard is an exotic place. There you'll find stacks and racks of contoured stock, organized under names that may make no sense at all: chair rail, base, quarter-round, shoe, casing, stool and so on. Not to worry. Look for crown or cornice molding, the stuff that's meant to be installed where the walls meet the ceiling. Collect samples of your favorites plus any others that might look good, like cove moldings. Don't buy long lengths at this stage. In fact, you can go home with a foot-long sample of each molding type. That's enough to design your project.
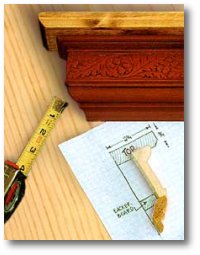
Use a single molding, or combine a few to create assemblies like the ones shown in the illustrations. Play with the pieces. Use your miter box to cut thin cross-sections from your molding samples, and use these slices to try out different assemblies (the lead photo shows a typical trial combination). Flat stock can also be part of your design. In fact, it's important to incorporate one or more filler pieces, to connect the moldings and strengthen the finished assembly. Once you've designed a cross-section, you can purchase molding to make your shelf as long or short as you like. When you buy the moldings that will make up the final project, allow a foot or so for waste. |
| 2. Assemble the pieces. The next step is to glue all the pieces that go under the shelf into a single assembly. These are the pieces that you'll miter, and it's much easier to miter-cut the whole assembly at once than it is to miter the parts separately and then assemble them. Glue flat moldings to the filler pieces first. If you're not using flat moldings, then glue the largest molding to its filler piece first. Spread wood glue on the mating surfaces, and then rub them together to help it penetrate and adhere. It's OK to drive brads or small finishing nails through the molding and into the filler pieces if this helps hold it in position just don't put them anywhere near your anticipated cuts. |
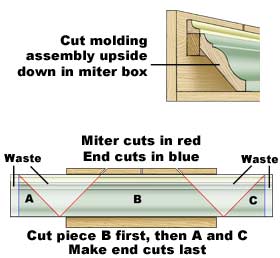 3. Cut the assembled support pieces. Measure and mark for the miter cuts from the center of the molding assembly, measuring along the bottom front edge. (For example, for a shelf support 3 feet long at the bottom, measure 1 1/2 feet on either side of the center point.) Place the assembly upside down in the miter box, with its back the side that will face the wall against the vertical fence of your miter box. (If your molding assembly is too tall for your miter box, attach a temporary wood fence tall enough to support the molding assembly, or make subassemblies that fit the box's fence and miter them separately.) Your marks will appear at the top. Line them up carefully against the blade slot of the miter box, press the assembly firmly into the cradle and miter-cut piece B, as shown in the drawing. 3. Cut the assembled support pieces. Measure and mark for the miter cuts from the center of the molding assembly, measuring along the bottom front edge. (For example, for a shelf support 3 feet long at the bottom, measure 1 1/2 feet on either side of the center point.) Place the assembly upside down in the miter box, with its back the side that will face the wall against the vertical fence of your miter box. (If your molding assembly is too tall for your miter box, attach a temporary wood fence tall enough to support the molding assembly, or make subassemblies that fit the box's fence and miter them separately.) Your marks will appear at the top. Line them up carefully against the blade slot of the miter box, press the assembly firmly into the cradle and miter-cut piece B, as shown in the drawing.
Note: We show all pieces pre-finished to help you keep track of the various parts. You can actually pre-finish the assembly before you do any cutting, and then touch up after you put everything together a good idea if you're using more than one color to finish your support pieces. (Bear in mind that the finish is apt to be damaged a little by even the finest saw.) Pieces A and C at either end of your shelf support are small, somewhat delicate parts. They are mitered where they fit against piece B and square-cut where they fit against the wall. Make the miter cuts first, and then the square cuts, as shown in the drawing. To make the square cuts in pieces A and C safely and accurately, place the pieces in the miter box, with their long sides (front edges) against the fence. Tip from the pros: Cut these pieces from the ends left over when you cut piece B, as shown here. That way, the molding pattern and wood grain will wrap around your finished support for a real professional's touch. |
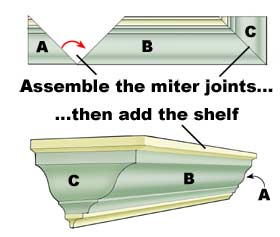 4. Assemble and finish. Glue pieces A and C to center piece B. Rub the ends together to spread the glue thoroughly and help it penetrate the wood. When it's tacky, align the mitered pieces and hold the joint together for several minutes, until the glue starts to set up. Leave the assembly upside down on a flat surface to dry. 4. Assemble and finish. Glue pieces A and C to center piece B. Rub the ends together to spread the glue thoroughly and help it penetrate the wood. When it's tacky, align the mitered pieces and hold the joint together for several minutes, until the glue starts to set up. Leave the assembly upside down on a flat surface to dry.
Now for the easy part. The top is simply a good-looking solid board with square-cut ends and a chamfered bottom edge. You can do your chamfering with a router, hand plane, table saw even a sander. Use 150-grit or finer sandpaper to go over both the shelf and the molding, smoothing out any unevenness. Pay close attention to the mitered joints. Now glue the shelf to the molding assembly and apply your finish. (If the shelf will have a different finish from the support, apply it before you install the shelf.) Painted molding beneath a stained or varnished top is a good combination, but other finish strategies also look nice. 5. Hang the completed shelf. It's easy to install your shelf. The back side is hollow, so it fits easily over a ledger strip fastened to the wall. Cut your ledger to fit under the top of the shelf and between the mitered ends. Level and fasten the ledger to the wall. Then fit the top of your shelf over the ledger and secure it with two screws driven through the top and into the ledger's top edge. You're done, and it looks great! |
☑ Tools & Materials:▸ Miter box w/ saw or ...▸ Compound miter saw ▸ Hammer ▸ Nail set ▸ Screwdriver ▸ Drill ▸ Bit set ▸ Measuring tape ▸ Board for shelf ▸ Moldings for shelf support ▸ Wood glue ▸ Finish nails ▸ Drywall screws |
No time to build? Check these out!
|
☑ Reference Books: For Your Woodworking Library | ||