 ❈ How to Build a Basic FenceIt's fun to build a fence. You're out in the fresh air, the project goes quickly, and it gives you a chance to gab with your neighbors.Our basic design sets the boards inside the posts, so both sides look equally good, which your neighbors will appreciate especially if the fence is near the property line. Add lattice to the top of our basic design, and you get a fence that's downright elegant. |
❈ Tools & Materials: | ||
|
- Mason's line - Hoe - Hand sledge - Chalk line - Tape measure - Line level - Plumb bob |
- Circular or miter saw - Post-hole digger - Drill - Shovel - Drill-bit set - Pick - Combination square |
- Safety glasses - 2 6" quick-action clamps - Level - Nailset - Hammer - Sawhorses - Wheelbarrow |
❈ Build It Right: |
| In most communities, you don't need a permit to build a fence that's off the property line and 6 feet high or less. But check your local building codes to be sure. Likewise, talk to your neighbors before anything is set (literally) in concrete. You might save yourself a lot of grief. Softwoods such as redwood, cedar and cypress are best for fences because they resist rot. The Uniform Building Code specifies using either foundation-grade Redwood or pressure-treated Douglas Fir, in both cases grade No. 2 or better. First-rate, rot-resistant fence wood can be hard to come by, but it's easy to find pressure-treated lumber (also called CCA wood), which has had rot-resisting chemicals forced into it under pressure. Make sure that any wood that touches the ground has a .40 retention rating, which indicates that the chemical treatment is strong enough to protect wood in constant contact with soil or concrete. |
❈ Step by Step Instructions: |
 1. Lay out the fence. Locate the ends of the fence and use a hand sledge to drive sturdy stakes or pipes where the end posts will be. Then stretch a mason's line between the stakes. If your fence is 30 feet or more, drive additional stakes every 15 feet or so, aligned with the end stakes. Otherwise, the wind could blow your mason's line and you could end up with a bowed fence. Stretch the mason's line from stake to stake, 3 feet or so above the ground, wrapping it around each stake in the same direction. When you're done, the line should be straight and run along the same face of each stake. 1. Lay out the fence. Locate the ends of the fence and use a hand sledge to drive sturdy stakes or pipes where the end posts will be. Then stretch a mason's line between the stakes. If your fence is 30 feet or more, drive additional stakes every 15 feet or so, aligned with the end stakes. Otherwise, the wind could blow your mason's line and you could end up with a bowed fence. Stretch the mason's line from stake to stake, 3 feet or so above the ground, wrapping it around each stake in the same direction. When you're done, the line should be straight and run along the same face of each stake. |
 2. Mark and dig the post holes. With a tape measure and felt-tip marker, measure and mark post locations on the mason's line. For our fence, we spaced posts every 6 feet. Use a plumb bob to plumb these marks down to earth. Mark the post centers on the ground with spray paint or scrap-wood stakes. When you've set the post locations, dig the post holes as shown in the animation, making each hole 2 feet deep and 1 foot wide. 2. Mark and dig the post holes. With a tape measure and felt-tip marker, measure and mark post locations on the mason's line. For our fence, we spaced posts every 6 feet. Use a plumb bob to plumb these marks down to earth. Mark the post centers on the ground with spray paint or scrap-wood stakes. When you've set the post locations, dig the post holes as shown in the animation, making each hole 2 feet deep and 1 foot wide. Note that hand diggers can handle roots up to a half-inch or so, and power diggers can munch through bigger roots and small rocks. But keep a pick and shovel handy you'll need them when the inevitable big rock or root bars your way. Always wear safety glasses when breaking up rock or using a power digger. |
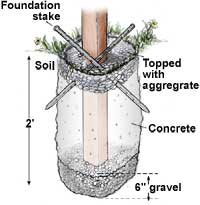
 3. Set the posts. Add 6 inches of gravel to each hole and place a 4-by-4 post loosely inside it. (If you're using pressure-treated posts, be sure to place an uncut end in the hole; it's loaded with preservative and will last longer.) Seat each post into the gravel an inch or so, then plumb it with a carpenter's level so that the post face is at least 1/4" away from the mason's line above. Then, using one face of the post as a guide, drive a foundation stake diagonally into the dirt near the top of the hole. Hammer an 8d double-headed nail through the stake into the post. Check plumb again, drive a second foundation stake in at a right angle to the first, and nail it to the post. (There are many ways to plumb posts, but we like foundation stakes because they allow you to do the job single-handedly.) Work carefully to ensure that each post is 6 feet apart on center from its neighbors, or board spacing could be a problem. 3. Set the posts. Add 6 inches of gravel to each hole and place a 4-by-4 post loosely inside it. (If you're using pressure-treated posts, be sure to place an uncut end in the hole; it's loaded with preservative and will last longer.) Seat each post into the gravel an inch or so, then plumb it with a carpenter's level so that the post face is at least 1/4" away from the mason's line above. Then, using one face of the post as a guide, drive a foundation stake diagonally into the dirt near the top of the hole. Hammer an 8d double-headed nail through the stake into the post. Check plumb again, drive a second foundation stake in at a right angle to the first, and nail it to the post. (There are many ways to plumb posts, but we like foundation stakes because they allow you to do the job single-handedly.) Work carefully to ensure that each post is 6 feet apart on center from its neighbors, or board spacing could be a problem.When you've correctly spaced and plumbed all the posts, fill the holes to within a couple of inches of the top with fence post mix, which already contains cement and aggregate all you have to do is add water. (That's easily done in a wheelbarrow: pour in a bag of fence post mix and add water gradually, stirring with a hoe till you get the right consistency.) Tamp the concrete well with a stick or rod, so that it fills evenly around the post. Let the concrete cure overnight, then remove the double-headed nails from the posts and pull out the foundation stakes. Top off the holes with concrete, this time an inch or two above the ground, sloping the outer rim downward from the post so that water will drain away from the wood. Plain concrete at the base of a post can be pretty ugly: aggregate pressed into the wet concrete looks much better. |
 4. Trim the post tops. When all the posts are securely set, stretch a chalk line across them and place a line level at its center. Adjust the line to trim all the posts level at about 1/4 inch below the top of the shortest post. Remove the line level, and snap the chalk line to mark the posts. Cut off the posts with a circular saw using the scrap-wood jig shown to guide the cut. 4. Trim the post tops. When all the posts are securely set, stretch a chalk line across them and place a line level at its center. Adjust the line to trim all the posts level at about 1/4 inch below the top of the shortest post. Remove the line level, and snap the chalk line to mark the posts. Cut off the posts with a circular saw using the scrap-wood jig shown to guide the cut.📌 A Tip to Prevent Splits: To prevent wood from splitting when you nail into it, drill pilot holes using a drill bit that's slightly more than half the thickness of the nail shank you're using. For 16d nails, use a 1/8" bit; for 8d nails, use a 3/32" bit. This is just a rule of thumb, however. The type of wood you're using and how close to the edge you're drilling ultimately determines whether the wood will split. If your workpiece splits even after you've drilled pilot holes, increase your drill bit size incrementally until you find one that keeps the wood intact. |
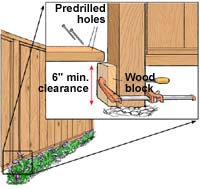 5. Add the rails. For the basic fence, nail 2-by-4 top rails into place with 16d galvanized box nails, predrilling to prevent splitting. To minimize the number of joints in the top rails, use 12-foot or 14-foot 2-by-4's. Where the pieces meet atop a post, align them so their ends center over the posts, preferably at a 45° angle to protect the end grain and minimize weathering. 5. Add the rails. For the basic fence, nail 2-by-4 top rails into place with 16d galvanized box nails, predrilling to prevent splitting. To minimize the number of joints in the top rails, use 12-foot or 14-foot 2-by-4's. Where the pieces meet atop a post, align them so their ends center over the posts, preferably at a 45° angle to protect the end grain and minimize weathering.Next, mark and cut the lower rails. These rails will last longer if they're at least 6 inches above the ground. Level the rails with the longest level you have, and use a combination square to mark rail locations on the posts. Again, predrill nail holes and toenail the rails to the posts with two 16d box nails at each joint. To keep rails from wandering as you toenail them, clamp a scrap-wood stop block to the post as shown. |
| 6. Add the inner frames and boards. The boards run vertically between posts and rails within a frame of 1-by-1's, as shown in the upper detail drawing. These frames act as stops for the fence boards so they don't wander when you nail them in. |
| Add one upper stop first. Measure and cut it to fit between the posts, and predrill nail holes in it every 6 inches. Set your combination square to measure 5/8 inch in from one edge of the upper rail, and then use the square to position the upper stop. Nail the stop into place and use a nailset to sink the nail heads. Next, measure, cut and nail the side stops onto the posts, also 5/8 inch in from the same edge as the upper stop. Finish with the bottom stop. |
| Next, measure and cut your 1-by-6 fence boards to fit between the upper and lower rails. Lay them across sawhorses, mark them with the combination square, and then cut them with a circular saw or a miter saw. If you want the edges of the boards to meet, just plumb the first one and start nailing them into place, checking plumb periodically. If, on the other hand, you want uniform spaces between boards, mark the spacing in pencil on the bottom rail first, so you can make adjustments before you start to nail. Often, the final board in a fence section will need to be cut to fit widthwise. For this, a table saw is best. Toenail the boards into the rails not the 1-by-1's with 8d finishing nails. (For toenailing, predrill holes at a 45° angle.) . With the boards in place, add the remaining 1-by-1 stops to finish the fence. |
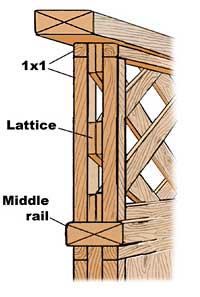 7. Lattice variation. This design varies in two ways from the basic fence above: it has a middle rail and a section of lattice between the middle and top rail. 7. Lattice variation. This design varies in two ways from the basic fence above: it has a middle rail and a section of lattice between the middle and top rail. Toenail the middle rail before you nail the top rail; clamping a scrap-wood stop block onto the post will keep the middle rail from migrating as you nail it. Follow with the top rail and then the bottom. Since each lattice panel has a frame of 1-by-1 stops on either side to hold it in, you'll need an additional set of 1 x 1's. Because lattice strips are thin and easily split, nail them with 4d nails rather than the 8d nails you're using for the boards. (You can save some money by cutting four 1-foot lattice panels from a single 4' x 8' panel.) The lattice is especially beautiful with trumpet creeper or jasmine intertwined through it. |
❈ What you Need for a 12 ft or 6 ft High Fence:▸ Two 5-foot layout stakes (scrap wood, pipe, etc.)▸ 2 cu feet of gravel ▸ Five sacks of fence post mix (a cement-aggregate admixture) ▸ Redwood, cedar, cypress or pressure-treated wood: - Three - 8 ft 4 x 4's - One - 12 ft or 14 ft 2 x 4 - Two - 6 ft 2 x 4's - 16 - 6 ft 1 x 1's - 12 - 12 ft 1 x 6's (Cut each board into two 6-footers) ▸ Six perforated steel foundation stakes (rent) ▸ 1/4 lb 16d hot-dipped galvanized box nails ▸ 1/2 lb 8d hot-dipped galvanized finishing nails ▸ 1/2 lb 6d hot-dipped galvanized finishing nails ▸ 12 8d double-headed nails For lattice-top variation, add:▸ Two 12" x 6 ft lattice panels▸ 1/2 lb 4d hot-dipped galvanized finishing nails ▸ Redwood, cedar, cypress or pressure-treated wood: - Two 6 ft 2 x 4's - 10 6 ft 1 x 1's (Again, cut down stock to get the lengths you need) |