|
| To use this jig you will need a tablesaw, stackable dado set, and a calipers with dial or digital readout. You can purchase the dial type for $25-$50; digital models cost $60-$75. We've found a dial calipers essential because box joints must be cut with exacting accuracy. Why? Any minor error in the width or spacing of the individual "fingers," even .001", multiplies itself with every finger you cut. For reasons of design and proportion, you typically make the individual "fingers" in box joints as wide as the thickness of the workpieces. In this article, we'll make a jig for cutting ¼" wide fingers in ¼"-thick stock (see the drawing below for the precise dimensions of the joints). For thicker or thinner stock you adjust the size of the jig's pin and the width and height of the dado cut accordingly. |
 |
 Step 1. Cut parts A, B, and C to the sizes shown in the Exploded View drawing above. Any flat and straight stock will do. Step 1. Cut parts A, B, and C to the sizes shown in the Exploded View drawing above. Any flat and straight stock will do.
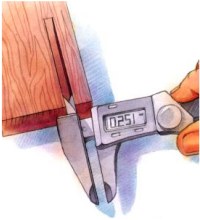
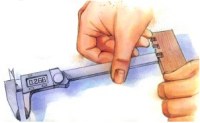
Step 2. Adjust your dado set for a cut that's .001" wider than the joint fingers (.251" in our example). With stackable dado sets you can place commercially made shims between the cutters, or make your own shims from various papers (standard tablet paper measures .002-.005" thick, some tissue and waxed papers measure .001" thick). Check your adjustment by measure a test cut with your calipers as shown below. Raise the dado set ½" above the tabletop. |
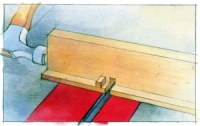
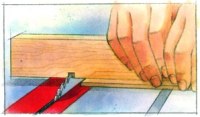 Step 3. Cut the notch that holds the pin in part A. Do this by holding part A against the miter gauge with part B beneath it as shown below. Do not cut into part B. Step 3. Cut the notch that holds the pin in part A. Do this by holding part A against the miter gauge with part B beneath it as shown below. Do not cut into part B. |
 Step 4. Cut a ¼" x ¼" x 6" strip of hardwood that fits snugly into the notch you just cut in part A. (The strip should slip into place, yet fit tightly enough so it doesn't fall out.) Cut a 1 ½" pin from the strip and glue it into the notch, flush with the back of part A. Save the leftover strip. Screw part B to part A. Step 4. Cut a ¼" x ¼" x 6" strip of hardwood that fits snugly into the notch you just cut in part A. (The strip should slip into place, yet fit tightly enough so it doesn't fall out.) Cut a 1 ½" pin from the strip and glue it into the notch, flush with the back of part A. Save the leftover strip. Screw part B to part A. |
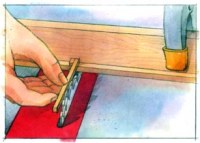
| Step 5. Set your miter gauge for a 90° cut. Use the leftover strip to position the jig assembly on the miter gauge. Do this by aligning the jig pin ¼" from the path of the dado set as shown above. With the pin aligned, temporarily clamp the jig to the miter gauge, then affix the gauge to the jig with screws. Replace the miter gauge into its slot and cut through parts A and B. Attach the blade guard (C) centered behind the notch you just cut. During this and the following steps, apply pressure to the miter gauge to hold its bar firmly against the right side of the slot. This will keep its distance from the dado set consistent during cuts. |
 Step 6. Position a piece of scrap stock as shown above, and cut a notch into the scrap piece. Position this notch over the pin and make another cut. Position that notch over the pin and repeat the cut. With your calipers, check the width of the fingers. They should be .001" under your desired finger width. (For our ¼" fingers the calipers should read .249".) Step 6. Position a piece of scrap stock as shown above, and cut a notch into the scrap piece. Position this notch over the pin and make another cut. Position that notch over the pin and repeat the cut. With your calipers, check the width of the fingers. They should be .001" under your desired finger width. (For our ¼" fingers the calipers should read .249".) |
 Step 7. Chances are your jig will need some adjustment to achieve the necessary finger width. If the fingers are too wide, say .255" in our example, tap the end of the jig closest to the blade with a hammer as shown above. Make more test cuts and tapping adjustments as necessary. If the fingers are too narrow (.245" in our example), tap the other end of the jig. Even though the jig is screwed in place, the hammer taps will make these fine adjustments. Step 7. Chances are your jig will need some adjustment to achieve the necessary finger width. If the fingers are too wide, say .255" in our example, tap the end of the jig closest to the blade with a hammer as shown above. Make more test cuts and tapping adjustments as necessary. If the fingers are too narrow (.245" in our example), tap the other end of the jig. Even though the jig is screwed in place, the hammer taps will make these fine adjustments. |
 Step 8. With your calipers, check the depth of the fingers in your scrap stock. Adjust the height of your blade until the depth reads .016" more than the width of your fingers (.266" in our example). This leaves the fingers long enough so you can sand them flush with the box later. Step 8. With your calipers, check the depth of the fingers in your scrap stock. Adjust the height of your blade until the depth reads .016" more than the width of your fingers (.266" in our example). This leaves the fingers long enough so you can sand them flush with the box later. |
|
 1. Before you cut the actual box joints, keep in mind that the width of your box sides must be an increment of the finger width. Otherwise, you'll wind up with less-than-pleasing partial fingers at the bottom of your box. So, in the example of ¼"-thick stock discussed here and in the jig-building article, the width of the workpieces must be an increment of ¼" (such as 5", 5 ¼", 5 ½", etc.). 1. Before you cut the actual box joints, keep in mind that the width of your box sides must be an increment of the finger width. Otherwise, you'll wind up with less-than-pleasing partial fingers at the bottom of your box. So, in the example of ¼"-thick stock discussed here and in the jig-building article, the width of the workpieces must be an increment of ¼" (such as 5", 5 ¼", 5 ½", etc.). |
| 2. Mark the front, back, and side pieces of your box. Also, mark the top edge on each of these pieces. For each box you make, you cut the sides consecutively, and the front and back consecutively. It doesn't matter which pair you do first, so we'll start with the sides. For all of the following cuts, hold the top edge of the workpiece toward the jig pin for the first cut.
Now, put hand pressure on the jig to hold its miter-gauge bar firmly against the right side of the tablesaw channel. Make the first cut as shown above. Place the just-cut notch over the jib pin and repeat to cut fingers along the full width of the workpiece. Cut the other side piece in the same fashion. |
 3. Before you cut the front and back, cut one notch into a scrap piece, just as you cut the first notch into the side piece earlier. 3. Before you cut the front and back, cut one notch into a scrap piece, just as you cut the first notch into the side piece earlier.
Position this notch over the pin as shown on the right, and butt the top edge of the front piece against the scrap before making a cut. Make the remaining cuts in the front piece by removing the scrap, placing the notch over the pin, and proceeding as described earlier. Cut the back piece just as you cut the front. |
 4. To join your box pieces, apply glue to all of the mating surfaces with a small brush. Tap the joints together with a rubber mallet if necessary. 4. To join your box pieces, apply glue to all of the mating surfaces with a small brush. Tap the joints together with a rubber mallet if necessary.
Clamp the box together as shown on the right. (You may need to position a clamp diagonally to square the box.) |
| Note that we used scrap pieces on each side of the corners to evenly distribute the clamping pressure along the joint. Wider boxes may require additional clamps. After the glue dries, sand the fingers flush with the sides, front, and back. Be careful not to round over the corners.
» Article Content © WOODstore.net |