
🌵 Search azWoodman
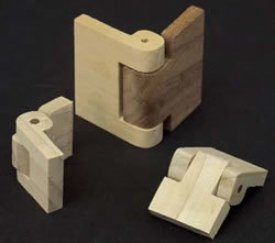
You can use metal hinges on the box, but I prefer to make my own out of the woods I'm using. You can use scrap wood to make them, and it's just a few more cuts with the scroll saw. But it's worth it to have perfectly matching hinges for your box!
 Gary has been scrolling since 1992 and has been making jewelry boxes on the band saw and table saw since 1986. Designing and making jewelry boxes on his DeWalt 788 saw are his primary interests. This is Gary's second article in Scroll Saw Workshop. His first article was "Octagonal Jewelry Boxes", featured in Summer 2004 (Issue #15). Gary's other interests are golf, gardening, and attending craft shows. This project is courtesy of Scroll Saw Woodworking & Crafts magazine. Also by Gary MacKay: Box-Making Projects for the Scroll Saw
 We are a participant in the Amazon.com Services LLC Associates Program, an affiliate advertising program designed to provide a means for sites to earn advertising fees by advertising and linking to Amazon.com.
Woodworking Tutorial
Making Wooden Hinges
... by Gary MacKayYou can use metal hinges on the box, but I prefer to make my own out of the woods I'm using. You can use scrap wood to make them, and it's just a few more cuts with the scroll saw. But it's worth it to have perfectly matching hinges for your box!
|
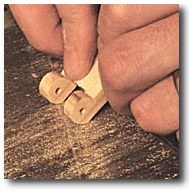
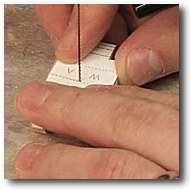
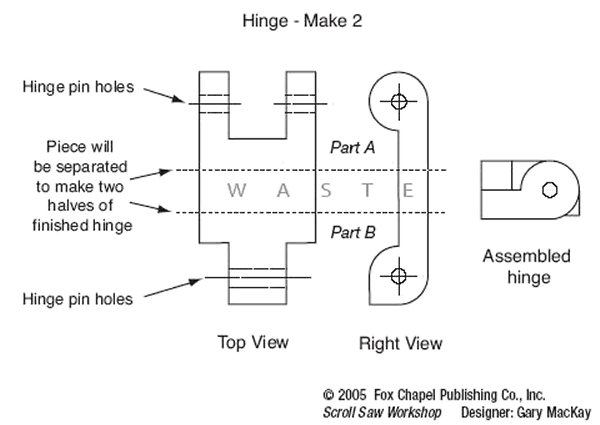
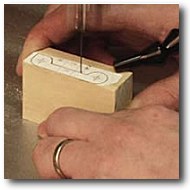 Step 1:Rough out the hinges. Start by making two photocopies of the right view hinge pattern. Attach the patterns to the hinge blank using the glue stick. Cut out this profile on the scroll saw.Attach the other pattern to the opposite side (so you know where to drill, see Step 2). |
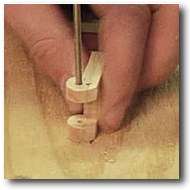
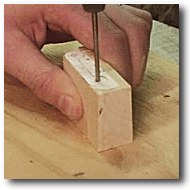 Step 2:Drill an 1/8"-diameter hole half way through the hinge blank where marked on the pattern. The dimple from the center punch will help to line the drill bit up properly.Support the hinge with a block of wood. Then turn the blank over and drill another hole where the diagonals connect. Drill deep enough to meet the hole drilled in the other side. Follow the same procedure to drill the hinge-pin hole on the opposite end. |
 Step 3:Cut out the hinge barrels. Attach the top view pattern to the hinges and cut along the solid lines.Do not separate the hinge halves until Step 6. |
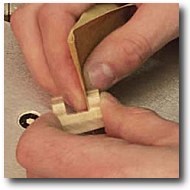
 Step 4:Round over Side A of the hinge using a detail sander or belt sander. Then round off one corner of Side B - leave the other corner square.The square corner will act as a natural stop and prevent the hinge from opening more than 100° to 110°. |
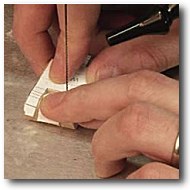
 Step 5:Mark one of the two hinge barrels on Side A with an "x." Use a 9/64"-diameter bit to enlarge the hinge-pin hole on that side a little bit.Do not enlarge hinge-pin hole in the other hinge barrel on Side A. Then reverse the hinge and use the 9/64"-diameter drill bit to enlarge the hinge-pin hole in Side B. |
 Step 6:Cut the hinge in half following the lines on the pattern. |
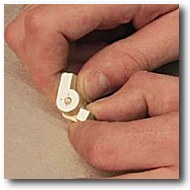 Step 7:Dry assemble the hinges, following the hinge assembly diagram, using a nail that fits loosely through the holes.You want to make sure that the hinge opens the proper amount and doesn't catch or bind at any point. |
 Step 8:Mark any places where the hinges bind.Sand those areas until the hinge opens freely. |
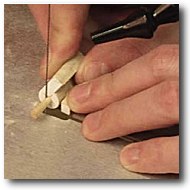 Step 9:Assemble the hinges using an 1/8"-diameter dowel. Glue the dowel in place using wood glue.Trim off any overhanging dowel with the scroll saw and sand the area smooth. |
About the Author: Gary MacKay
Gary has been scrolling since 1992 and has been making jewelry boxes on the band saw and table saw since 1986. Designing and making jewelry boxes on his DeWalt 788 saw are his primary interests. This is Gary's second article in Scroll Saw Workshop. His first article was "Octagonal Jewelry Boxes", featured in Summer 2004 (Issue #15). Gary's other interests are golf, gardening, and attending craft shows. This project is courtesy of Scroll Saw Woodworking & Crafts magazine. Also by Gary MacKay: Box-Making Projects for the Scroll Saw
We are a participant in the Amazon.com Services LLC Associates Program, an affiliate advertising program designed to provide a means for sites to earn advertising fees by advertising and linking to Amazon.com.